

How To Repair A Frigidaire Ice Maker That Won Stop Making Ice
How to Avoid Refrigerator Repairs
Updated: Oct. 19, 2022
These six maintenance steps will prevent near refrigerator breakdowns.

Spend 30 minutes on these simple maintenance steps to keep your refrigerator running in tip top shape. It'due south hard to believe, but six simple maintenance steps will forbid nigh 100 percentage of refrigerator breakdowns and eliminate those service calls. Take these steps and you tin forget about spoiled food, lost time waiting for repair people and shelling out $70 an 60 minutes plus parts for the repair itself. In this story, nosotros'll prove yous how to continue your fridge humming and trouble-free. And we'll also tell you what to check if a problem does occur.
Y'all might also like: TBD
- Time
- Complexity
- Toll
- An hr or less
- Beginner
- Gratis
Step 1: Make clean the fridge condenser coils (5 minutes)
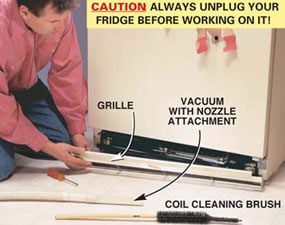
Photograph one: Remove the grille
Unsnap the grille at the lesser of the refrigerator to access the coils. If your coils are located on the back, yous'll accept to roll the fridge out to go at them.

Photo 2: Brush off the coils
Clean the coils with a special refrigerator gyre cleaning brush to loosen the dirt and grit. Vacuum the coils as you brush. Exist careful not to bend the fan blades. A gentle brushing will do the job.

Cleaning Coils on the back of the fridge
Some refrigerators have the coils on the back of the unit. Brush and vacuum these coils in the same manner as coils found under a refrigerator.
You can eliminate more than 70 per centum of service calls with this elementary cleaning step (Photos 1 and ii). Skip this chore and you lot'll be contributing to your appliance repair technician's retirement fund. Not to mention handing over $5 to $10 a calendar month actress to your utility company because the fridge isn't running efficiently.
Do information technology twice a year or more ofttimes if you have shedding pets. Their fur clogs up the coils fast.
Condenser coils are located on the back of the fridge or across the lesser. These coils cool and condense the refrigerant. When the coils are clogged with dirt and dust, they tin't efficiently release rut. The event is your compressor works harder and longer than it was designed to, using more free energy and shortening the life of your fridge.
Clean the coils with a coil cleaning brush and vacuum. A coil cleaning brush does a thorough job and will easily pay for itself. The refrigerator coil brush is bendable to fit in tight areas. They can be used for cleaning your dehumidifier and air conditioner coils too.
CAUTION:
Always unplug your fridge earlier working on it!
Step two: Clean the refrigerator condenser fan (5 minutes)

Photograph 1: Remove the lower back cover
Access the condenser fan by rolling the fridge away from the wall and removing the lower dorsum comprehend with a screwdriver. Supervene upon the cover when you're finished. It'south essential for proficient air circulation.
Photo 2: Brush and vacuum the fan
Clean the fan blades with the castor and vacuum so air can motility freely beyond them. Besides make clean the shaft past vacuuming the crease where the bract meets the motor. Don't lubricate the shaft; oil will concenter dirt and crusade problems.
If the coils are located on the bottom of the refrigerator similar ours, clean the condenser fan and the expanse around information technology. (Fridges with coils on the back don't have a fan.) The fan circulates air across the coils to help absurd them. At times, paper, clay, grit and fifty-fifty mice can go sucked into the fan and bring it to a consummate stop.
Photos 1 and 2 show you how to clean the fan. Yours could be in a different area, but it'southward always next to the compressor. Most refrigerators will take a diagram on the dorsum or folded up under the front grille showing the location of the major parts. While you lot're nether at that place, wipe out the baste pan, a flat pan that collects water from the defrost bike and allows it to evaporate.
Pace three: Wipe down the fridge door gasket (2 minutes)

Make clean the door gasket
Wipe the door gasket regularly with warm water and a sponge. Don't use detergent—information technology tin can damage the gasket.
Preclude an expensive gasket repair beak ($100 to $200) and cutting downward air leaks past keeping your door gasket clean. Syrup, jelly or any other sticky stuff dripping down the forepart sides of your refrigerator can dry and mucilage the gasket to the frame. The next fourth dimension you open the door, your gasket tin can tear. Keep it clean and yous'll go a dainty, tight seal, keeping the cool air where it belongs, in the refrigerator.
To prevent wear, lubricate the door handle side of the gasket by sprinkling baby pulverisation on a cloth and wiping it downward once a calendar month.
3 Types of Refrigerators
All refrigerators work on the same principle of cycling refrigerant through two sets of coils. The evaporator coils do the cooling, and the condenser coils release accumulated estrus. Where fridges primarily differ is in how they defrost.
A transmission defrost is the oldest and simplest blazon. As the proper name implies, you defrost these by turning them off and letting all the ice melt. The water then drips into a pan or runs into the refrigerator where you wipe it up.
Bicycle defrost refrigerators have an evaporator plate in the fridge department that warms after each running bicycle to eliminate frost buildup. But yous have to defrost the freezer manually by turning a dial to the defrost mode. The h2o in most models flows into a channel in the back and then down through a tube to a baste tray under the fridge.
The frost-free refrigerator, the most common today, uses a heater to melt water ice on the evaporator coils. The heater is turned on by a timer and automatically shuts off. An evaporator fan distributes the cold air through the freezer. Many models have an opening under the crisper drawers to draw water to the baste tray underneath.
Step four: Articulate the freezer vents (v minutes)
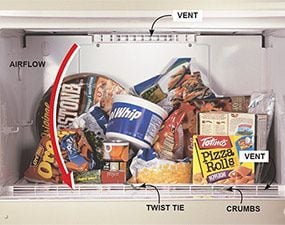
Keep the freezer vents unobstructed
Articulate food packages abroad from the vent openings and clean the air return so crumbs and twist ties don't clog them.
These footling vents on frost-free fridges allow air to circulate in the freezer. Don't block them or let crumbs or twist ties get sucked in around the evaporator fan or clog the drain tube. To assistance save free energy, proceed your freezer virtually three-quarters total to retain cold air. But don't pack it any fuller because the air needs to circulate.
Pace five: Set the refrigerator temperature controls to the middle settings (1 minute)
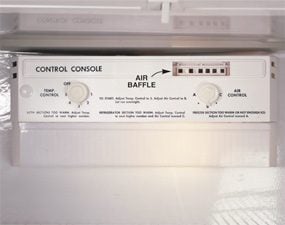
Adjust the temperature controls
Prepare the temperature controls to the center settings. Brand whatever adjustments co-ordinate to a refrigerator thermometer. The optimum setting for your fridge is between 38 and 42 degrees F; the freezer, between 0 and 10 degrees.
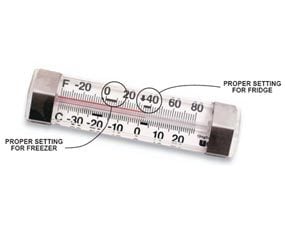
Temperature settings
Save money by keeping your freezer set at 0 F and your fridge fix at forty F.
This footstep won't necessarily prevent a repair, but it'll extend the life of your fridge past allowing it to run more efficiently, which reduces your electrical pecker. Your fridge has at least 2 temperature controls (except on manual defrost types, which have ane). The one for the nutrient compartment is a thermostat that turns the compressor on and off. The 2d, for the freezer, is just an air baffle. The baffle lets cold air from the freezer sink into the food compartment. Closing the bamboozle makes the freezer colder.
Iii Means to Get the Odour Out
- Charcoal briquettes blot the smell only like a filter in a range hood.
- Crumpled paper. The ink absorbs the odor.
- Baking soda is the quondam standby. Get out an open box in the fridge and supersede it every three months for continuous deodorizing.
Step half-dozen: Clear and clean the baste openings (2 minutes)

Locate the baste cup
Find the baste opening on your fridge

Close upwards of the drip tube opening
Locate the drip opening and wipe it out, being careful non to press any droppings down into the hole. Suck out crumbs with a vacuum.
Drip openings allow water that has melted from the defrost cycle to catamenia downwardly to a pan located by the compressor, where it evaporates. Check your owner's manual for the location on your fridge. On wheel-defrost fridges, a channel directs the h2o to a tube in the food compartment.
On frost-free refrigerators, wait for a small cap under the crisper drawers that covers a hole, or an opening in the back of the freezer or refrigerator. If the bleed opening clogs, water volition build up under the crisper drawers and eventually leak out onto the floor.
Troubleshooting
Service specialists will be the first to acknowledge: A ton of their callers don't require repair service at all. The solutions are so piece of cake they don't even require a toolbox. Earlier you lot pick upwardly the phone, check the following listing. Information technology just might save you $seventy and a chip of embarrassment.
Got power?
- Check the circuit breaker or fuse box to be sure power'southward coming to the outlet.
- Is the cord plugged in tight? Wiggle information technology around a little. A worn receptacle could let the plug fall out just plenty for the connection to neglect.
- Plug a light or any other electric device into the outlet to encounter if it works. If it doesn't, you've got an electrical problem, non a fridge problem.
- Check for a loose, worn or frayed ability cord. Rodents often chew through a wire. Sometimes cords loosen when the refrigerator is moved.
What if yous take power only poor cooling?
- Make certain the thermostat is turned on and gear up right. On some models the dial is hands bumped, shutting the fridge down. Or kids could accept messed with it.
Your refrigerator is running all the fourth dimension simply the food'due south still warm.
- Vacuum the coils. Muddy coils tin can eventually cause the overload protector on the compressor to shut the refrigerator down. It'll automatically come up back on when the compressor cools, but by then your nutrient is usually warm.
- Is the condenser fan jammed? (This applies only to fridges with the coils on the lesser.) Remove whatsoever obstacles and make clean it thoroughly. Unplug the fridge and turn it a few times and come across if it comes on. If it'due south still not working, you'll have to supplant it.
- Is the light turning off when the door'due south closed? That petty light seedling can heighten the temperature in the fridge substantially. To cheque information technology, close the door and apply a butter knife to pull the gasket slightly away from the frame. If light shines out, the switch is bad or slightly out of alignment. Until you fix the switch, loosen the light seedling and then it goes out.
- Await for ice buildup (frost-free fridges only) bulging on the inside walls or the flooring of the freezer. Manually defrost the freezer by unplugging it. It'southward simply a temporary fix, so telephone call for service.
Required Tools for this Refrigerator Repair Project
Have the necessary tools for this DIY project lined upward before you start—yous'll save time and frustration.
Coil cleaning brush
Originally Published: July 09, 2022

Source: https://www.familyhandyman.com/project/how-to-avoid-refrigerator-repairs/
Posted by: jaredfroneam1996.blogspot.com
0 Response to "How To Repair A Frigidaire Ice Maker That Won Stop Making Ice"
Post a Comment